Posted on Leave a comment

What are AN fittings?

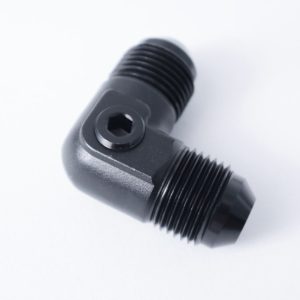
AN fittings, also known as Army-Navy fittings, are a type of fitting used in high-performance automotive and racing applications. They are designed to provide a secure, leak-free connection for fuel, oil, and other fluid systems, and are popular among car enthusiasts for their strength, durability, and versatility.

One of the main advantages of AN fittings is their ability to handle high pressures and temperatures. They are typically made from aluminum or steel, which are strong and lightweight materials that can withstand the high pressures and temperatures found in high-performance engines. Additionally, AN fittings are designed to be reusable, which means they can be disconnected and reconnected multiple times without losing their seal.

Another advantage of AN fittings is their versatility. They come in a variety of sizes and styles, which allows them to be used in a wide range of applications. For example, they are commonly used in fuel systems, oil systems, brake systems, and intercooler systems. They can also be used to connect hoses, lines, and other components together.

When it comes to selecting AN fittings, the first thing to consider is the size of the fitting. AN fittings are available in a range of sizes, from -4 to -20, with -4 being the smallest and -20 being the largest. The size of the fitting you choose will depend on the size of the hose or line you are using, as well as the pressure and flow rate of the fluid you are working with.

Another important factor to consider when selecting AN fittings is the type of fitting. There are a few different types of AN fittings available, including straight, elbow, and tee fittings. Straight fittings are used to connect two hoses or lines together, while elbow fittings are used to change the direction of a hose or line. Tee fittings are used to split a line into two or more lines.

Lastly, it’s important to consider the material of the fitting. AN fittings are commonly made from aluminum or steel. Aluminum fittings are lightweight, corrosion-resistant, and suitable for most applications. Steel fittings are stronger and more durable, and are typically used in high-pressure and high-temperature applications.

In conclusion, AN fittings are a popular choice among car enthusiasts and racers for their strength, durability, and versatility. They are designed to handle high pressures and temperatures, and come in a variety of sizes, styles, and materials. When selecting AN fittings, it is important to consider the size, type, and material of the fitting to ensure that it is suitable for your application.

Posted on Leave a comment

What hoses should I use for my oil cooler?

Oil cooler hoses are an essential component of any engine’s lubrication system. They are responsible for transporting hot oil from the engine to the oil cooler, where it is cooled down before being circulated back into the engine. This process helps to keep the engine running at optimal temperatures, which can help to improve performance and extend the life of the engine.

Oil cooler hoses are typically made from rubber or silicone, and they come in a variety of sizes and shapes to fit different engine configurations. They are designed to withstand the high temperatures and pressures of an engine’s lubrication system, and are typically reinforced with fabric or wire to provide additional strength and durability.

There are a few things to consider when choosing oil cooler hoses for your engine. The first is the type of engine you have. Some engines, such as high-performance racing engines, may require hoses that can withstand higher temperatures and pressures than a standard passenger car engine. This is because high-performance engines generate more heat and put more stress on the lubrication system. For high-performance or motorsport applications, FLF recommends the use of a nylon-braided rubber hose to handle the temperatures, pressures, and chemical resistance necessary for oil cooler systems.

It’s also important to consider the routing of the hose, as oil cooler hoses that are routed through tight spaces or tight bends may be more prone to failure. Make sure to choose hoses that are flexible and have a large enough minimum bend radius for your application.

In conclusion, oil cooler hoses play a vital role in keeping your engine running at optimal temperatures. When choosing hoses for your engine, it’s important to consider the type of engine, the type of oil, routing, and the type of connector. With the right oil cooler hoses, your engine will run smoothly, efficiently, and last longer.

Posted on Leave a comment

What is PTFE hose and why should I use it for my E85 fuel system?

E85 fuel, also known as flex fuel, is a blend of 85% ethanol and 15% gasoline. It has become increasingly popular in recent years as a way to reduce dependence on fossil fuels and lower emissions. However, it also poses some unique challenges when it comes to fuel delivery systems.

One of the biggest issues with E85 is its tendency to cause hose failure. This is because E85 is more aggressive than gasoline, and can cause the hoses in a fuel system to degrade over time. The hoses can become brittle and crack, which can lead to leaks and even engine failure.

To combat this problem, many automakers and aftermarket companies have started using PTFE (polytetrafluoroethylene) hoses in their fuel systems. PTFE is a synthetic fluoropolymer of tetrafluoroethylene, which is resistant to chemical attack, high temperatures, and pressure. PTFE hoses are much more resistant to the corrosive effects of E85 than traditional rubber hoses, and are less likely to crack or fail.

PTFE hoses are also more flexible than traditional rubber hoses, which makes them ideal for tight spaces and tight bends. They are also much more resistant to heat, which is important in high-performance engines.

However, PTFE hoses are not without their own set of challenges. They are slightly more expensive than traditional rubber hoses, which can make them cost-prohibitive for some applications. They also have a much higher minimum bend radius, which can make them difficult to route in tight spaces.

In conclusion, E85 fuel is a great alternative to gasoline, but it can be challenging to use in fuel systems. PTFE hoses offer a solution to this problem, but they are also not without their own set of challenges. It is important to weigh the pros and cons of both options when deciding on a fuel delivery system for an E85-compatible engine. PTFE hoses are a great option for those who want the added durability and resistance to E85, but they come at a higher cost.

Posted on Leave a comment

Oil Catch Can Systems Explained!

A catch can is a great way to filter excess oil vapor and other contaminants from your oil and prevent them from entering your intake system, it can improve engine performance and help keep your engine’s valves clean and free from deposits. However, among the enthusiast community I have seen these installed improperly, and this can lead to poor performance or other problems. I’ve spent significant time, research, and experimenting with different catch can setups to determine what performs best for a naturally aspirated or forced induction engine.

Typical stock PCV setup

First let’s look at what your factory or OEM setup might look like. You probably have one or more PCV valves on your valve cover and one or more ports on your block. When your intake manifold is in vacuum (throttle closed or partially closed) the valve opens, evacuating the crankcase of vapors. The PCV valve is also metered, meaning it’s designed to only allow a certain amount of air to flow through it. An unmetered valve, like a check valve, could cause a high idle or excessive crankcase vacuum.

High idle is wasting fuel and adding unnecessary NVH and can cause overheating when stopped. Excessive crankcase vacuum is also bad, remember that your engine has rubber seals that are designed to keep oil from leaking out, not from air leaking in. If your setup is causing high crankcase vacuum, you can actually force air to come in around the seals, possibly causing them to fail and start leaking oil later on. The PCV valve helps regulate the pressure between the intake manifold and the crankcase to keep things in check.

You should also have a connection between your valve cover and intake pipe, either leading up to your throttle body or up to your turbo/supercharger. This serves two functions, one is to serve as a source of filtered air into the engine ( this is why it’s called a breather) and to also serve as a vent for excess crankcase vapors when the PCV valve is closed, such as under boost or full-throttle acceleration.

This is fine for stock engines or engines with slight modification, but it’s less than ideal for performance or boosted engines. Excess oil vapor is allowed into the intake manifold and combustion chamber to be burned, which is problematic because oil has a much lower octane rating than even Regular gasoline and the PCV valve can leak under boost, further pressurizing the crankcase with boost pressure.

Next let’s look at a simple catch can setup:

Simple catch can setup between PCV port and intake manifold

In this basic catch can setup, the catch can sits between the PCV valve(s) and the intake manifold port. This captures the oil vapor that normally would pass directly into the intake manifold under vacuum, helping to keep your valves clean. However, the breather port is still connected directly to the intake, and some oil vapor may still pass through into the manifold.

Let’s look at another setup:

Intake manifold port blocked off, PCV and/or breather ports connected to catch can

In this setup, the intake manifold port is blocked off or capped and the PCV and breather ports are connected to a catch can, then connected to the intake tube. This is pretty simple and will capture some vapor gases, but there isn’t sufficient pressure differential between the crankcase and the intake tube to evacuate the crankcase. The result of this can be a buildup of pressure inside the engine, causing oil to leak past the crank and cam seals and possibly cause oil to back up in the turbo and seep past the seals.

Let’s look at the system that we recommend the most:

PCV and breather ports connected to separate catch cans

This is what we recommend, the dual catch can system. We believe that this is the best-case scenario that enables the PCV valve to do it’s job in regulating airflow, the PCV-side catch can to capture oil being evacuated by the manifold vacuum, and allows the breather side to work properly to ensure proper airflow into and out of the crankcase. You may connect the breather-side catch can either to the intake tube or vent-to-atmosphere if regulations allow.

The downsides to this setup are that space may be a concern in tight engine bays as having two catch cans and the plumbing running around the engine bay might make fitting them a concern, but we believe this is well worth the trouble to ensure peak performance and reliability.

Posted on Leave a comment

What is an AN fitting?

We get asked this question quite a bit from enthusiasts that are new to AN fittings, so here’s a quick explanation:

The AN specification is a particular type of fitting used to connect hoses and/or rigid tubing that carries fluid. It was originally developed for the US military and dates back to World War II from a standard agreed upon by the Army and Navy, hence AN.

AN sizes range from -2 to -32, although larger sizes can be made if desired. This sizing system is called a “dash size”, and is measured in 1/16-inch increments. For example, a -8 fitting would be 8/16-inch or 1/2-inch. It is common to incorrectly say “minus eight” as the hypen looks like a minus sign, the correct term would be “dash eight” or “dash ten” depending on the size.

AN fittings use a flare to seal the connection. There is a 37-degree machined flare on both the male and female sides of the connection that forms a metal-to-metal seal. There are other standards that use a similar system, such as JIC and SAE flared fittings, but these may not be compatible. Mixing them can cause damage to the fitting or a leak at the flare.

Posted on Leave a comment

How to Assemble PTFE Hose End Fittings

PTFE hose ends are quite a bit different from regular swivel hose ends intended for braided rubber hose. PTFE hose is closer in design to a “flexible tube” than a rubber hose, and the hose ends seal using a ferrule (sometimes called an olive) rather than sealing by sandwiching the rubber between the hose end body and collar. It’s important to make sure you follow the proper procedures to ensure correct assembly, reliability, and performance. Remember, hoses fittings aren’t just for looks or for delivering fluids, they are safety items designed to ensure that the fluids they are carrying get to where they need to go without leaking. Failure properly assemble these parts can lead to poor performance or leaking flammable fluids, and we all know that’s not good!

Step 1: Cut the hose to desired length.
Measure twice and make sure the hose is the length necessary to go from Point A to Point B. If necessary you can try cutting it a bit longer than you actually need to, then shortening it up a bit until the length is just right for your application. It’s important to ensure you get a clean perpendicular cut on the hose, as deviations can cause the hose to not seal properly inside the hose end, leading to leaks. In fact, on PTFE hose ends, any significant deviation from 90 degrees means you won’t be able to get the ferrule on the hose at all.

Note: Cutting the hose requires special tools. We don’t recommend using metal cut-off wheels or abrasive cutting tools as these can cause a large amount of dust to build up in the hose which must be cleaned prior to continuing the assembly process. Failure to clean can result in the dust entering your parts, causing damage. We recommend using either a hydraulic hose cutting blade or a 350 MCM electrical cable cutter.

Step 2: Place the collar on the hose
This is an extremely important step that is very easy to forget. Many will begin attempting to get the ferrule onto the hose, then realize that they cannot get the collar on because the overall width of the hose at the tip has increased. The collar is sized perfectly for the hose you have, so if you do this then you will need to cut the hose back to an untouched area (typically about 1 inch back) in order to perform this step.

Actually performing this step is very easy, simply slide the narrow part (opening without the threads) onto the hose.

Step 3: Place the Ferrule on the tip of the hose
Begin by first making sure the hose is perfectly round. The ferrule is machined very precisely and the inside of the barrel matches very closely to the outside of the PTFE inner liner, and significant deviation from a circle means that you won’t be able to get this part on. You can use the hose end body as a tool to re-shape the inner liner and get it in shape. Sometimes the braiding can interfere with the placing of the ferrule, if that is the case then use a small flathead screwdriver or similar device to gently separate the braiding, taking care to avoid piercing the liner.

Please be aware that ANY significant fraying of the outer braid can cause it to get caught in the threads during assembly in a future step, so be sure to use a pair of scissors to trim any fraying to prevent damage during assembly.

Step 4: Lubricate the hose end body
Apply a small amount of oil to a rag and use the rag to apply the oil to the hose end body. Only a thin layer is necessary. Do not use anti-seize or grease. Be sure to cover the threads, nipple, and if desired, lubricate the threads on the socket. Only a small amount of oil is necessary to help the parts slide. Don’t go nuts.

Step 5: Assemble!
Now you can begin assembly of the hose end. First bring the collar up to the tip of the hose and insert the hose end body’s barb into the hose-ferrule assembly. Bring the collar and hose end body together and begin threading by hand. If you are not able to do this, there may be fraying or something interfering with the engagement. Remember, if you feel ANY kind of binding then stop immediately. These parts are made of aluminum and are very soft, if there is binding then this means that there is a flaw in the machining or you are cross-threading the parts. They are machined very precisely and if it doesn’t go together smoothly then something is wrong.

You should be able to get the hose end body to within about 1/16″ (1-2mm) of the socket. This is best to ensure a proper seal and to make sure it looks good.

Step 6: Clean and Test
Clean the hose and hose end with a solvent to remove any excess oil or residue, then immediately pressure test the completed assembly. If you encounter any leaks, determine the reason why and take steps from there to resolve the leaks. If you do not have access to a pressure tester, then when the hose assembly is installed in the vehicle then ALWAYS make sure you observe for any leaks or issues before putting the vehicle into service.

Posted on Leave a comment

How to Assemble Swivel Hose End Fittings

Assembling a hose end looks tricky at first, but it’s actually very simple. It’s important to make sure you follow the proper procedures to ensure correct assembly, reliability, and performance. Remember, hoses fittings aren’t just for looks or for delivering fluids, they are safety items designed to ensure that the fluids they are carrying get to where they need to go without leaking. Failure properly assemble these parts can lead to poor performance or leaking flammable fluids, and we all know that’s not good!

Step 1: Cut the hose to desired length.
Measure twice and make sure the hose is the length necessary to go from Point A to Point B. If necessary you can try cutting it a bit longer than you actually need to, then shortening it up a bit until the length is just right for your application. It’s important to ensure you get a clean perpendicular cut on the hose, as deviations can cause the hose to not seal properly inside the hose end, leading to leaks.

Note: Cutting the hose requires special tools. We don’t recommend using metal cut-off wheels or abrasive cutting tools as these can cause a large amount of rubber dust to build up in the hose which must be cleaned prior to continuing the assembly process. Failure to clean can result in the dust entering your parts, causing damage. We recommend using either a hydraulic hose cutting blade or a 350 MCM electrical cable cutter.

Step 2: Insert hose into the socket/collar
Place the socket in a vise (preferably with our Billet Vice Jaw Insert) and insert the hose until the end of it is close to the bottom of the threads. There should be an approximately 1/8″ (2-3mm) between the threads and the end of the hose. Getting this right is important because if it’s not all the way in, the hose may not seal against the hose end body. When inserting the hose, be sure to keep the braiding intact, particularly if you’re using nylon braided hose. If it gets too frayed, it will increase the outer diameter of the hose and make it difficult to insert into the socket.

Step 3: Lubricate the hose end body
Apply a small amount of oil to a rag and use the rag to apply the oil to the hose end body. Only a thin layer is necessary. Do not use anti-seize or grease. Be sure to cover the threads, nipple, and if desired, lubricate the threads on the socket and inside the hose. Only a small amount of oil is necessary to help the parts slide. Don’t go nuts.

Step 4: Assemble!
You may assemble the socket and body with either part in the vise. You may find one method more comfortable than the other. Either way, the procedure is the same: Hold the hose with one hand to prevent it from moving, then push the nipple into the hose through the socket to ensure proper engagement, then gently start the threads. If you feel ANY kind of binding then stop immediately. These parts are made of aluminum and are very soft, if there is binding then this means that there is a flaw in the machining or you are cross-threading the parts. They are machined very precisely and if it doesn’t go together smoothly then something is wrong.

You should be able to get the hose end body to within about 1/16″ (1-2mm) of the socket. This is best to ensure a proper seal and to make sure it looks good.

Step 5: Clean and Test
Clean the hose and hose end with a solvent to remove any excess oil or residue, then immediately pressure test the completed assembly. If you encounter any leaks, determine the reason why and take steps from there to resolve the leaks. If you do not have access to a pressure tester, then when the hose assembly is installed in the vehicle then ALWAYS make sure you observe for any leaks or issues before putting the vehicle into service.

Posted on Leave a comment

New Finish Line Factory Products!

Hey everyone, with the new stocking order we received last week we also used that opportunity to add new items to our inventory. Check them out below! 
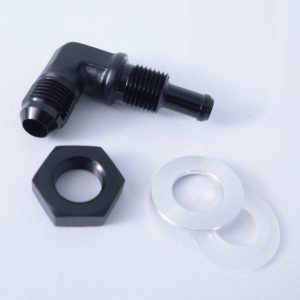
AN to Barb Fuel Cell Bulkhead Have you ever had the hassle of trying to plumb fittings into a fuel cell, especially with in-tank fuel pumps with limited space? Well this is the solution! Now you can run AN fittings from the outside of the fuel cell or fuel tank directly to your fuel rail and back!
Female AN to Male AN Expander (Step Up) Do you have a small AN size that you need to bump up to a larger AN size? Then this is what you need.
AN to AN Swivel Coupler 45, 120, 150, 180 Degree Previously we only offered AN to AN swivel couplers in straight and 90 degree angles. Joining the mix are 45s, 120s, 150s, and 180s, giving you more options in routing your AN fittings.
AN Check Valve Need to control the one-way flow of your fluid delivery system? Then you’re gonna want one of these. Also available in AN to Metric! 
BSPP to AN Adapter – Straight For those awkward situations where you encounter an NPT hole that doesn’t quite seem to work. Note that this is the parallel thread BSP adapter, the tapered thread is coming soon!